CoC: Homerun at Osmanville

We’ve been playing through the 29, Lets Go! campaign for Chain of Command casually since the beginning of the year. We weren’t interested in fighting back and forth through the scenarios and replaying until the Americans won, so we just played each scenario once and moved on. Dan and I wrapped it up with scenario 5 last night. We’ve learned a bunch of lessons over the course of the campaign. One of the first was that this game tends to take longer than 2 hours to play. I’ve had a number of people tell me that they get through the average game in just about 2 hours, our experience is that with two players each game should take about 3 hours to fight to a conclusion. At the 2.5 hour mark we’re usually able to tell how its going to go, but we wouldn’t actually reach the objectives for at least another half an hour. Considering our time restraints (it’s an hour drive for me to get to the store) we generally call it right around 10-10:15 so I can make it home by midnight.

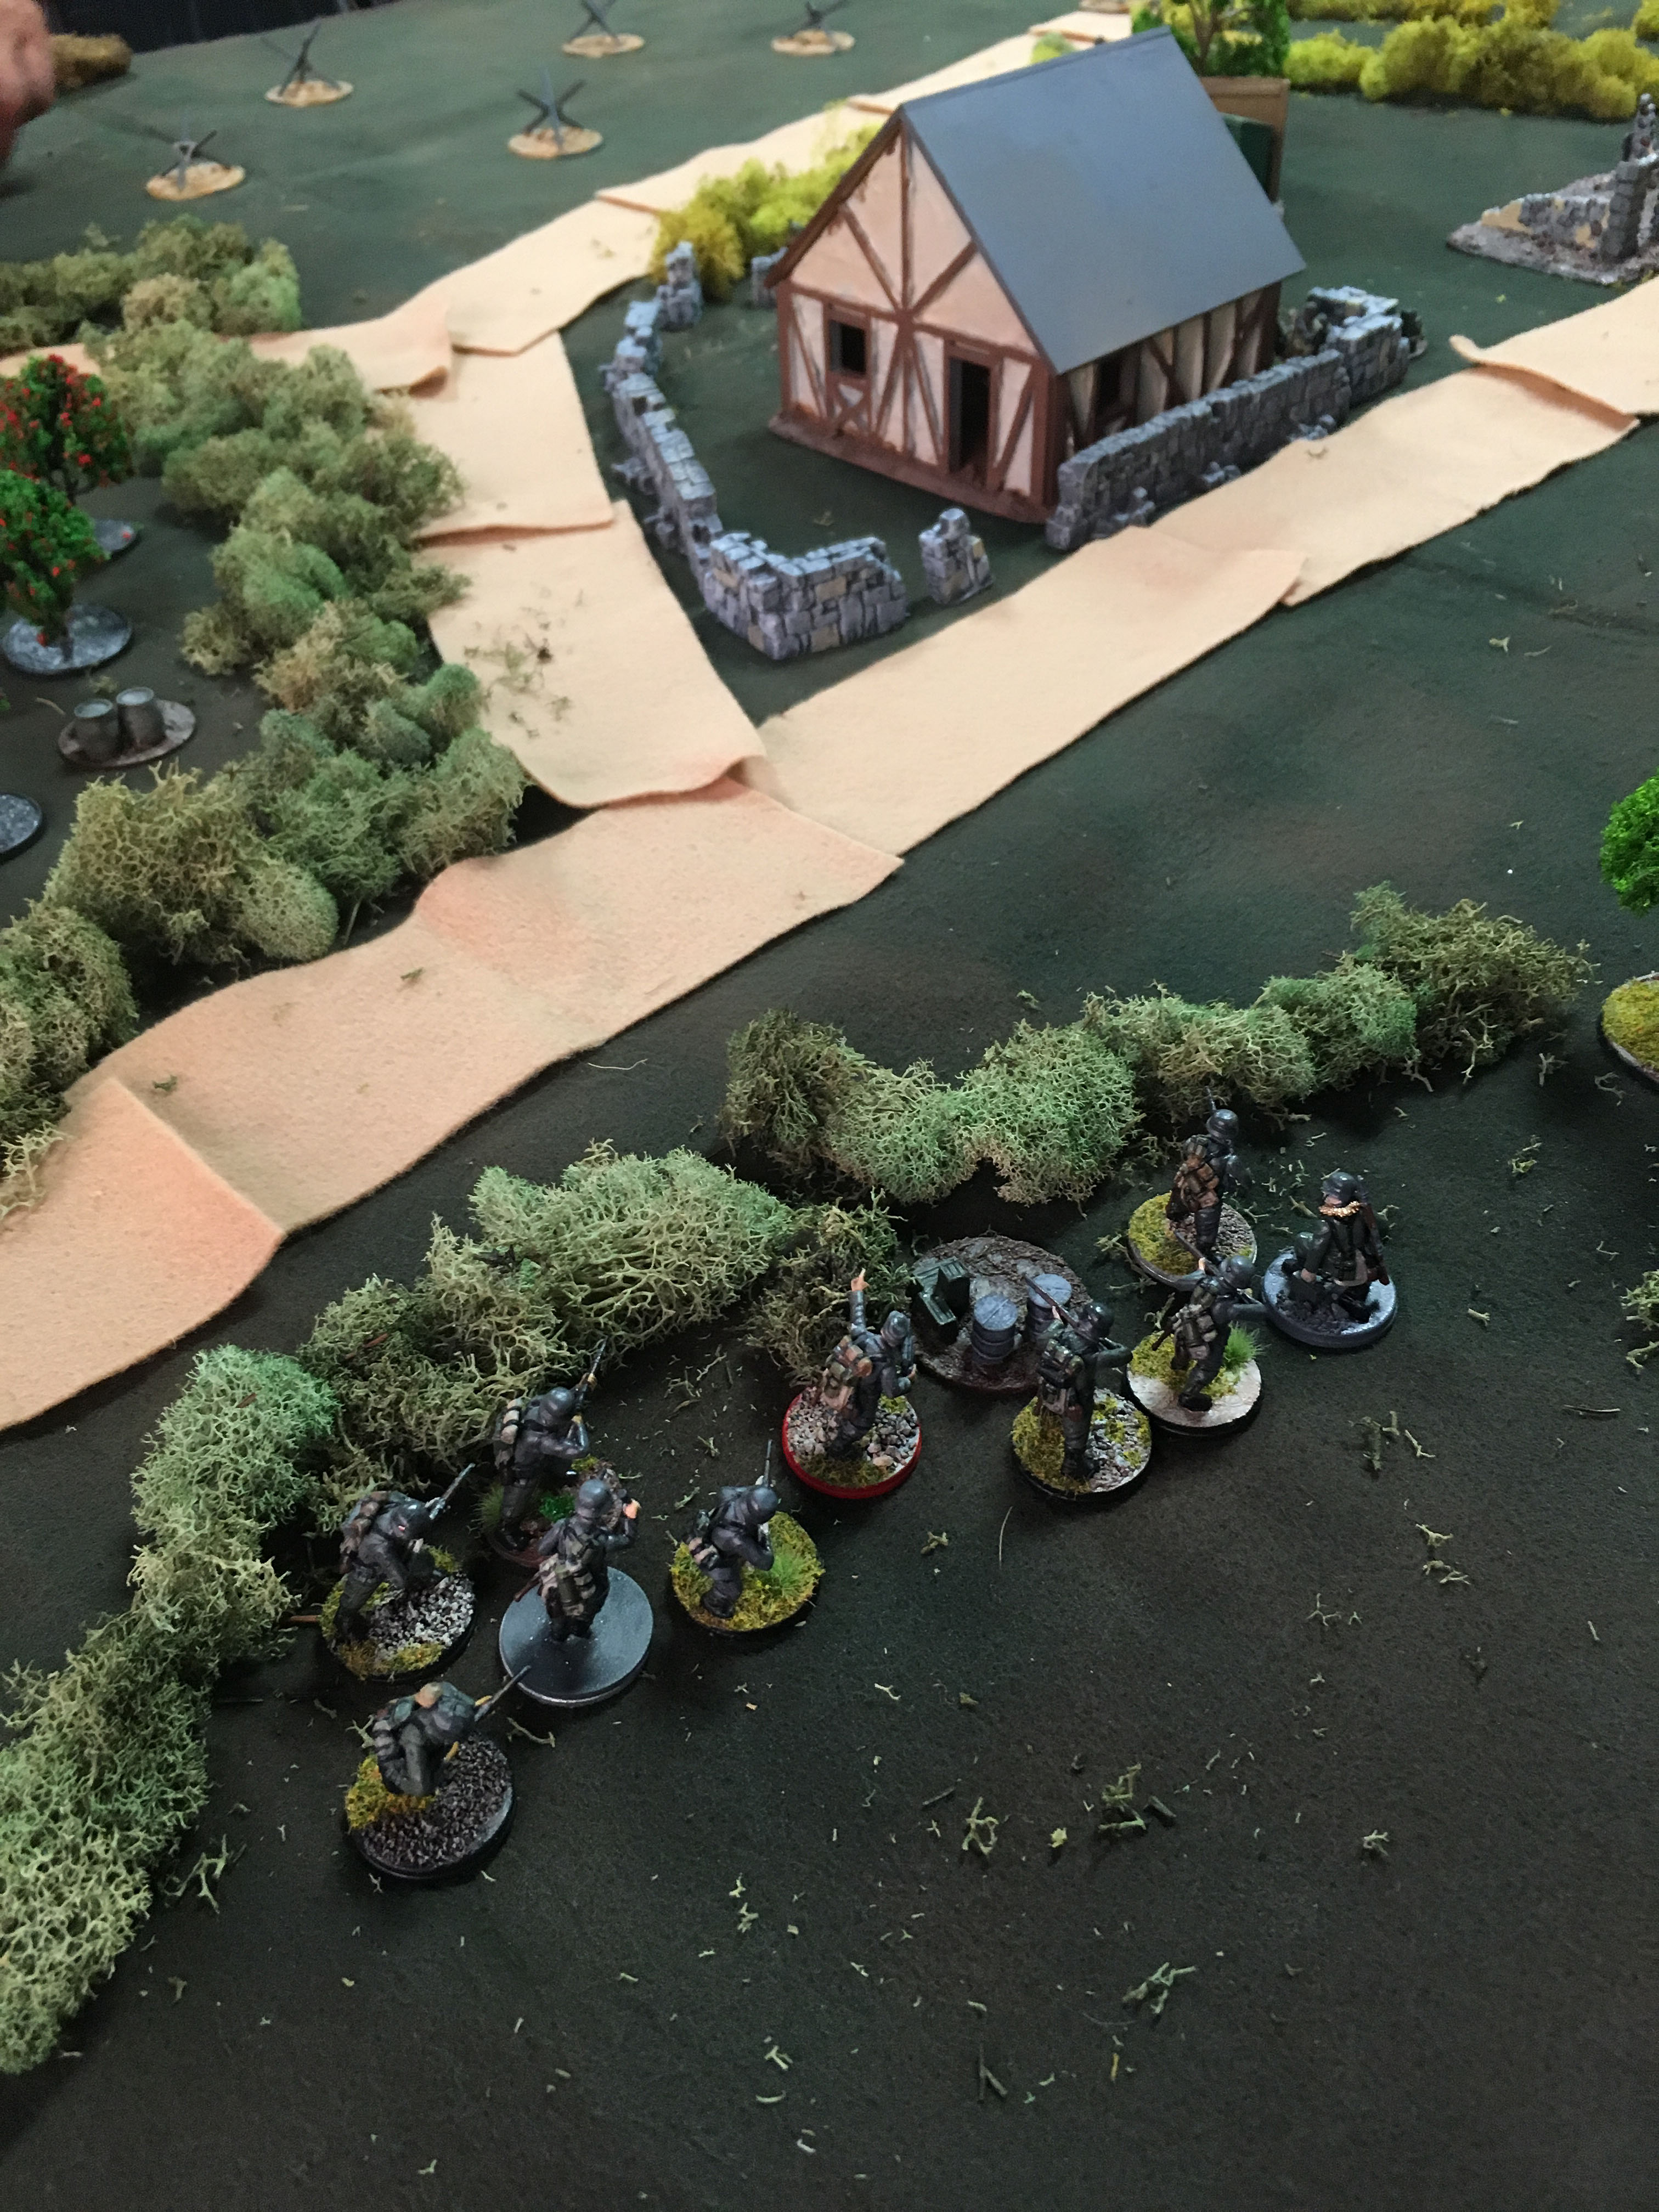
The building on the far left is the objective, the Americans have to either reduce my force morale to 0 or take the building and end the turn to win. Our Patrol Phase wound up with us deploying our jump off points about 3/4 of the way up the board, one either side of the second house and hedges there. Dan’s tank would, of course, have to deploy down one of the roads.

Dan chose his mandatory Sherman, plus a .50 cal and a .30 machine gun and the extra BAR for each squad. The .50 cal would go on to be the American VIP I believe, the reduction in cover being a major factor and one of the things that makes it almost mandatory for us now.


I chose a PAK38, an MG42, an adjutant and two pieces of barbed wire. With the Americans having TWO senior leaders and the Germans only having one I felt I needed to get mine on the board early. Rolling multiple 4’s would be an ongoing theme for BOTH sides during this game. I unfortunately left the barbed wire stands at home, so had to make do with a roadblock on the upper road. I think the barbed wire would have been a lot better, letting me deny the spot that the Americans used to great effect.

The game started off with a good American deployment at the house. .50 cal, one full squad and the platoon Sargent, I answered with two squads, one in the upper right of this photo and another just to the left with a clear line of sight down the wall in front of the house. I also deployed the MG42 in the second floor of the house. I fired on the .50 cal to no effect.

Dan opens up with his .50 cal dealing 4 kills to a German squad, it’s cover reduced to nothing do to the heavy weapon. My Germans respond with a double activation, deploying the Pak38 on the only road the Sherman can come down and firing on Dan’s mortar, doing only a single shock.


Dan responds with a double activation of his own, Firing the .50 cal on the same German squad up in the corner, causing them to break as the casualties and shock stack up. They will never recover from this and spend the rest of the game cowering behind several hedges.

Dan uses the Marching Fire ability to hop a wall and put some fire down on the squad I had deployed across from the house. The only thing that saved me was having gone tactical at the end of my last activation in fear of the .50 cal. Dan followed this up on his second activation with 2 kills and 3 shock! His mortar landed a round on the Pak38, adding one shock and a kill. I continued this throughout the game, using my senior leader on this squad to remove shock and have them go tactical, the only thing that saved them.

I used my activation to shoot on Dan’s advancing squad with both of my squads and throw some hand grenades to minimal effect, 1 kill and 1 shock.

Dan decided to bring on his Sherman at this point, unfortunately I didn’t have a full CoC die to fire on it with the Pak38! His main gun causes only shock on the anti-tank gun.

Thankfully I rolled another double activation! Firing with my squads and then following up with a Handgranaten attack I almost wipe out Dan’s squad at the stone wall, they break and Dan simply removes the 2 survivors from the table. I fall back behind the hedge I came from and go tactical again. There’s not much left of this squad but they would survive right up until the end of the game, falling back far enough that the senior leader could start commanding the MG42 to fire.

My Pak38 saw it’s short useless life ended as the Sherman hits it again, causing two kills and breaking the unit. The two survivors run for their lives with five shock on two men. (use I’m using a 105 howitzer as the PAK38)

I roll four 4’s, only activating my MG42 to fire at the .50 cal. Dan one ups me by rolling five 5’s and quickly ending his phase.

The MG42 FINALLY kills the .50 cal in the next turn, it had been hiding behind a stone wall for so long!

At this point Dan has not managed to cross the road. His men are concentrated around this house, with one squad inside, one advancing to take the position I had assaulted at then retreated from. That’s a .30 cal team behind the house taking shots at my squad after routing the Pak38 team. Outside of this photo is a mortar team and a Sherman right down the road on the left. It’s not looking good for the Germans, but the Americans haven’t taken the house yet. I’m down to one squad that you can barely see on the left of the photo above, one MG42 in the house and the remnants of a squad in front of my house. If I could hold them here I can win at this point.

Dan advances his Sherman down the road, FINALY having a full Chain of Command die I ambush with my Panzerschreck team. A long range shot immobilizes the tank and adds two pins! Dan pours fire into my last full squad for a second round as causes them to break, abandoning their position. I begin to run my leader over to try and remove the shock.

As I activate next to follow up Dan does the same to me, killing the Panzerschreck team before it gets off it’s shot. And of course I fail to get a photo of the tank at any point in the game! It’s a Sherman, you’ve seen tons of them.

At this point we call the game. It’s after 10 and I have one squad reduced to an LMG team, one squad breaking, whats left of the first squad I deployed never going to recover from it’s broken status and an MG42. Dan has a full chain of command die and I have a force morale of 5. Dan can easily use his CoC die to end the turn and remove the two broken squads. He has an immobilized tank that has a line of sight to the objective building with the MG42 in it and two full squads along with two senior leaders on this board. We forgo the 30 minutes of Americans mopping up at their leisure and call it an American win.

This is our fifth game of the year so far. We’ve both started using our nations abilities to good effect. Dan was using Marching Fire to pin down one squad while hoping between stone walls, I used Hangranaten to effectively wipe out a squad that was causing me problems. Dan’s gets his money’s worth out of the .50 cal, reducing my cover along with the mortar he took for the same reason. I’ve been using my leaders to have squads go tactical, and now I need to start using covering fire and overwatch more often. I think the Germans are hampered from not being able to take another squad in this campaign. They can take a squad of green conscripts once in the whole campaign, and I’m not convinced it would be worth it. I would have loved to have a fourth infantry squad, it would have allowed me to be much more flexible in my coverage of the approach to the house. All in all it was a great game.


29, Lets Go! Scenario 2. Delaying Action at Arthenay.

Dan and I continued the 29, Lets Go! campaign with scenario 2, a delaying action at Arthenay. Our first game was a 4 player version of the Probe into La Cambe. Both Dan and Matt wrote up nice AARs of it on their blogs.

http://laststandatcairngorm.blogspot.com/2017/03/la-cambe-chain-of-command.html

http://saltflats1929again.blogspot.com/2017/03/chain-of-command-29-lets-go-scenario-1.html


I was an American player in the first scenario and my flank bogged down as two squads got caught out in the open after trying to exploit a double activation. I hopped over a hedge after rolling two sixes, counting on rushing forward and laying down some close range fire on the second activation. Unfortunately the next toss of the dice didn’t allow me to do anything with those squads. They got caught in the open and torn up over the course of a couple of German activations. The two Shermans that charged up the road to reinforce them got ambushed by a panzerschreck team and an off board 88 laying in ambush. It was getting late and we had to call the game. The Americans started with 11 force moral and I believe we were down to 6 at about 10:30 with my platoon pretty much combat in-effective and the two Shermans knocked out we all felt it was just a matter of mopping up the remaining units and we called it as a German victory. The Americans withdrew and called in artillery and leveled the farm (we didn’t feel like replaying the scenario).


Dan and I met to play the second scenario. Dan brought his Americans and I fielded the German side this time. Setting up the table as it is pictured in the campaign book leaves a lot of open field for the Americans to charge across. I was looking forward to the MG42 getting a work out. We played out the Patrol Phase and decided that the fields counted as light cover, so a jump off point could be deployed there. I put a jump off point in an orchard, a small walled section and I had to place one farther back next to a house becuase of the rules for the scenario. Dan had one in the field, one in an orchard at the edge of his table and one behind a long row of hedges. I was able to lock his patrol markers down and force him to put the jump off point almost at the edge of the table. This was my plan since I had two barbed wire sections to put down on the side of the hedge near the road, stopping him from hammering away at the MG42 in the walled in section at close range. It paid off since the machine gun team pretty much held that side of the table. Click on the photos to enlarge them.


Dan got a double activation right off the bat. This allowed him to deploy almost his entire platoon onto the table. Unfortunately they had nothing to shoot at! He held back his Sherman and forgot about a second .30 cal team for the rest of the game. Dan’s mortar team fired often but never caused a casualty. I guess it evens out my sniper being all but useless, causing a single casualty.


I had a good activation and deployed the machine gun team and one squad into the orchard. This squad would wind up holding off the Americans on that side of the board all game with fantastic rolls, 6-8 hits per phase stacking the shock and casualties. Lots of letters home to mom because of the MG42 there.

Dan had deployed a squad on the hedges which exchanged fire with my MG42 team behind the stone wall. The hard cover was working to my advantage and he decided he needed to rush the wall and kill my men. On a double activation he hopped the wall and moved forward, firing at close range. I had been luck all night with my casualty rolls but they were catching up with me. Four shock and a casualty racked up and the team was in danger of being pinned.

On my activation I deployed my senior leader to support the machine gun and a squad into the house to reinforce the flank. The senior leader removed some shock and ordered them to return fire. Despite the Americans being in the open I didn’t inflict enough casualties.

I decided to use a CoC die to end the turn, giving me the next activation. The senior leader removed the last of the shock and ordered the team to open up again on the American squad in the open. My reinforcing squad was in place and opened up on them too. The angles meant that only the MG42 team could get line of sight on them but 10 dice isn’t all that bad and then added to the GI’s bad day. Dan took the next opportunity to jump the squad back over the hedge just after they lost their junior leader.

The Americans in the wheat field were not having any better luck. They had stalled once they entered the fields and were trying to trade fire with the German squad in the orchard. Odds were on the Americans side since they had a squad backed up by a .30 cal team but the dice gods were not on Dan’s side. The German Orchard squad were crack shots. 10-15 dice per turn were resulting in 5-8 hits regularly. Dan was having some luck on the casualty results but it just kept adding up.

His return fire wasn’t as effective, either not enough hits or good results on the casualty rolls. I lost a couple men but the shock wasn’t coming quick enough. Repeated activation with the junior leader were keeping them in check. By the time the Sherman was deployed in support Dan had both his Senior leaders supporting that flank. The American infantry squad was whittled down to just one BAR and a couple rifles and the .30 cal was taking hits (although not many pins). It was all he could to do keep the shock down. He did manage to rally them back from a break though, losing the broken team that had failed to assault the stone wall on the other flank in the process. The Sherman and some covering fire from the squad held back in reserve quickly forced the orchard squad into pinned and to broken status, forcing my senior leader to dash across the road and halt their retreat. It didn’t matter, the hedge side of the board had collapsed and the Germans were pushing the counter attack.

After the Americans had jumped back over the hedge to take cover they quickly were pinned and then broken.

As they fled the Germans hopped up and charged the jump off point. Dan had been fairly lucky on his morale rolls, bringing him down a lot slower than I would have liked so I wanted to get the JOP from him. Plus, I have never taken a jump off point before so I wanted to have the glory! I had been holding a squad in reserve, not needing it yet and hadn’t decided where to deploy it. I quickly deployed it and charged it forward. The squad in the house had to run forward, adding shock as they went. Just as the reached the hedge the Sherman came on board and as it crept up it peppered the bushes with machine gun fire, threatening to halt me before I reached the JOP.

As the Sherman crept up again for a better shot my Marder’s that were laying in ambush opened up, brewing the tank up and ending the game. I had captured the JOP and destroyed the tank on in the same turn, dropping the force morale to 0 and forcing the retreat.

This had been the first game I’ve actually played to completion. Dan had been rolling ok with the morale loss and only lost 2 points once so it was a real challenge to knock him down I think. One more shock on my MG42 and the charge up to the wall would have succeeded I think. I had three full chain of command dice at that point (having started with two from the scenario) and I was forced to use one to get my senior leader to remove the shock and return fire with the machine gun. He was in a really exposed position and I was afraid that Dan would deploy his senior leader on that flank, rally the section and close in. The machine gun was already down to a 4 man team with two shock and without another activation he could have broken the team. I had a full squad right there and would have immediately engaged him, but that machine gun was essential in holding both flanks.

Hindsight is 20/20, I think if Dan had deployed his third squad to the hedges instead of behind the wheat field it would have made a huge difference. I certainly wouldn’t have taken the jump off point. Dan also forgot about one of his .30 cal teams and his mortar was pretty useless. if he had taken two .50 cal teams (they reduce cover) he would have taken the orchard. All of the hedges were only light cover, hammering at the squad there with a .50 cal would have resulted in far more shock and, more importantly casualties and he would have advanced through the fields, forcing me to defend from the house. I need to find my .50 cal teams and paint them up!

The Germans have pretty limited support options in this campaign unfortunately. They have no vehicles and no mortars, they can take an infantry gun once, and a Pak38 once. They can take a Pak40 for seven points, a MG42 or a forward observer for four, a sniper team for three points and after this second scenario they can take a squad of green conscript troops but will suffer a penalty to their morale rolls at the beginning of the scenario if they do. The rest of the options are roadblocks, barbed wire, entrenchments, mine fields, medical orderly and an adjutant. Pretty limited combat options. I had meant to bring my Pak40, but forgot. I’m glad I did since the MG42 was essential!

The Americans can take (and sometimes HAVE to take) Shermans, both .50 and .30 machine guns, mortars (I’ve never had much luck but they also drop cover by one level when they hit), flame throwers, engineer teams, extra bazookas (to hit what?) and have the option of doubling up on BARs. Obviously the Americans are on the offense and brought everything possible over for the invasion, but it certainly looks pretty lopsided. This is the third game of CoC I’ve played this year and I’m starting to get the hang of it!