
I’ve decided to do some solo wargaming, in part to learn the Two Hour Wargames system but also to get some more gaming in. So tonight I set up my first solo game of Nuts! A squad from the US Airborne was patrolling through the Normandy farmlands.

Chronicling the eternal struggle to reduce the Lead Pile
I’ve decided to do some solo wargaming, in part to learn the Two Hour Wargames system but also to get some more gaming in. So tonight I set up my first solo game of Nuts! A squad from the US Airborne was patrolling through the Normandy farmlands.

One of my 2019 projects was to paint up a bunch of Nazi Zombies for our yearly Weird War II game at Council of Five Nations. I picked up a couple boxes of Studio Miniatures Die Verdammten, plastic Nazi Zombies. At the time they had a bundle that included two twenty zombie boxes, some alternate metal heads and a metal Nazi officer mini. I was excited to have cheap ‘multi-pose’ plastic miniatures so I could fill the table without breaking the bank.

While they’re technically multi-pose there is only two bodies, one alternate head and three sets of arms per sprue, so the actual range of poses is limited. I used the alternate heads and left over bits from my Warlord figures to increase the variety. The Warlord figure were also very usefully for using up the left over arm and head bits from the Zombie sprues, leaving little waste and ‘fleshing’ out the horde.
Continue reading “Studio Miniatures Die Verdammten (Nazi Zombies)”2019 is almost done and I haven’t blogged since the beginning of the year! I set out in January with a goal of painting 350 28mm miniature figures, with my major projects being a WWII Soviet army, Terminator Genisys miniatures and a mix of zombies including some Nazi Zombies for a convention game in my hometown I attend every October. I never got to the Soviets, as a matter o fact I’m trying to sell them off since I don’t think I want to do the Warlord Games plastics, they’re too fiddly and the weapons are too prone to breaking. and I didn’t do nearly as much as I thought I would of the other tree. I wound up only getting 16 Nazi zombies and 8 modern zombies done, and only 28 of the Genisys miniatures completed. Considering how easy the Terminators are to paint that’s a pitiful amount.

I took on two commissions from friends, one a continuation for Murph of his German WWII army and another from a new player at the club just south of me for another German WWII army. It helped fund some hobby purchases and is part of the reason I got so many of my own Germans done this year but it did cut into my painting time, I was worried I wasn’t going to make my goal but I picked up speed as fall hit and the convention stuff was done.
Continue reading “Wrapping up my first 350! 2019 painting in review.”2018 was a slow year for me. Between finishing up a degree, having a baby and starting a new job miniatures and gaming took a back seat. 2019 is upon us, the baby is almost a year old and I’m settling into the new job pretty well. I started thinking about what I want to get accomplished this year and decided to set myself a goal. 350 miniatures painted by the end of the year. This sounds lofty, but there are several reasons I think I can get this done.
These three projects account for roughly 250 of my 350 goal. The rest will consist of D&D minis, finishing up the German and US WWII armies I have, finishing up some German minis for a friend and a whole bunch of 6mm stuff I dug out of storage when my Ogre Minis II pledge showed up.
The second part of my New Years pledge is to not buy hundreds of minis this year. I’ve made several allowances if the prices are right. For years I’ve been drooling over two lines of minis. I missed out on the Starship Troopers game when it first came out and Dreamforge games makes a line of Eisenkern minis that I like. I have some of each already now and keep looking out for good prices. I still need some vehicles for my Soviet army, and if Warlord runs another sale after my raise comes in I will grab a couple vehicles. I already have enough to paint for this year though.
The year has started well, it’s the last week in January and already I have almost 60 minis finished for Terminator and another couple dozen random minis that were assembled and primed so I could clean of the paint desk.
We’ve been playing through the 29, Lets Go! campaign for Chain of Command casually since the beginning of the year. We weren’t interested in fighting back and forth through the scenarios and replaying until the Americans won, so we just played each scenario once and moved on. Dan and I wrapped it up with scenario 5 last night. We’ve learned a bunch of lessons over the course of the campaign. One of the first was that this game tends to take longer than 2 hours to play. I’ve had a number of people tell me that they get through the average game in just about 2 hours, our experience is that with two players each game should take about 3 hours to fight to a conclusion. At the 2.5 hour mark we’re usually able to tell how its going to go, but we wouldn’t actually reach the objectives for at least another half an hour. Considering our time restraints (it’s an hour drive for me to get to the store) we generally call it right around 10-10:15 so I can make it home by midnight.

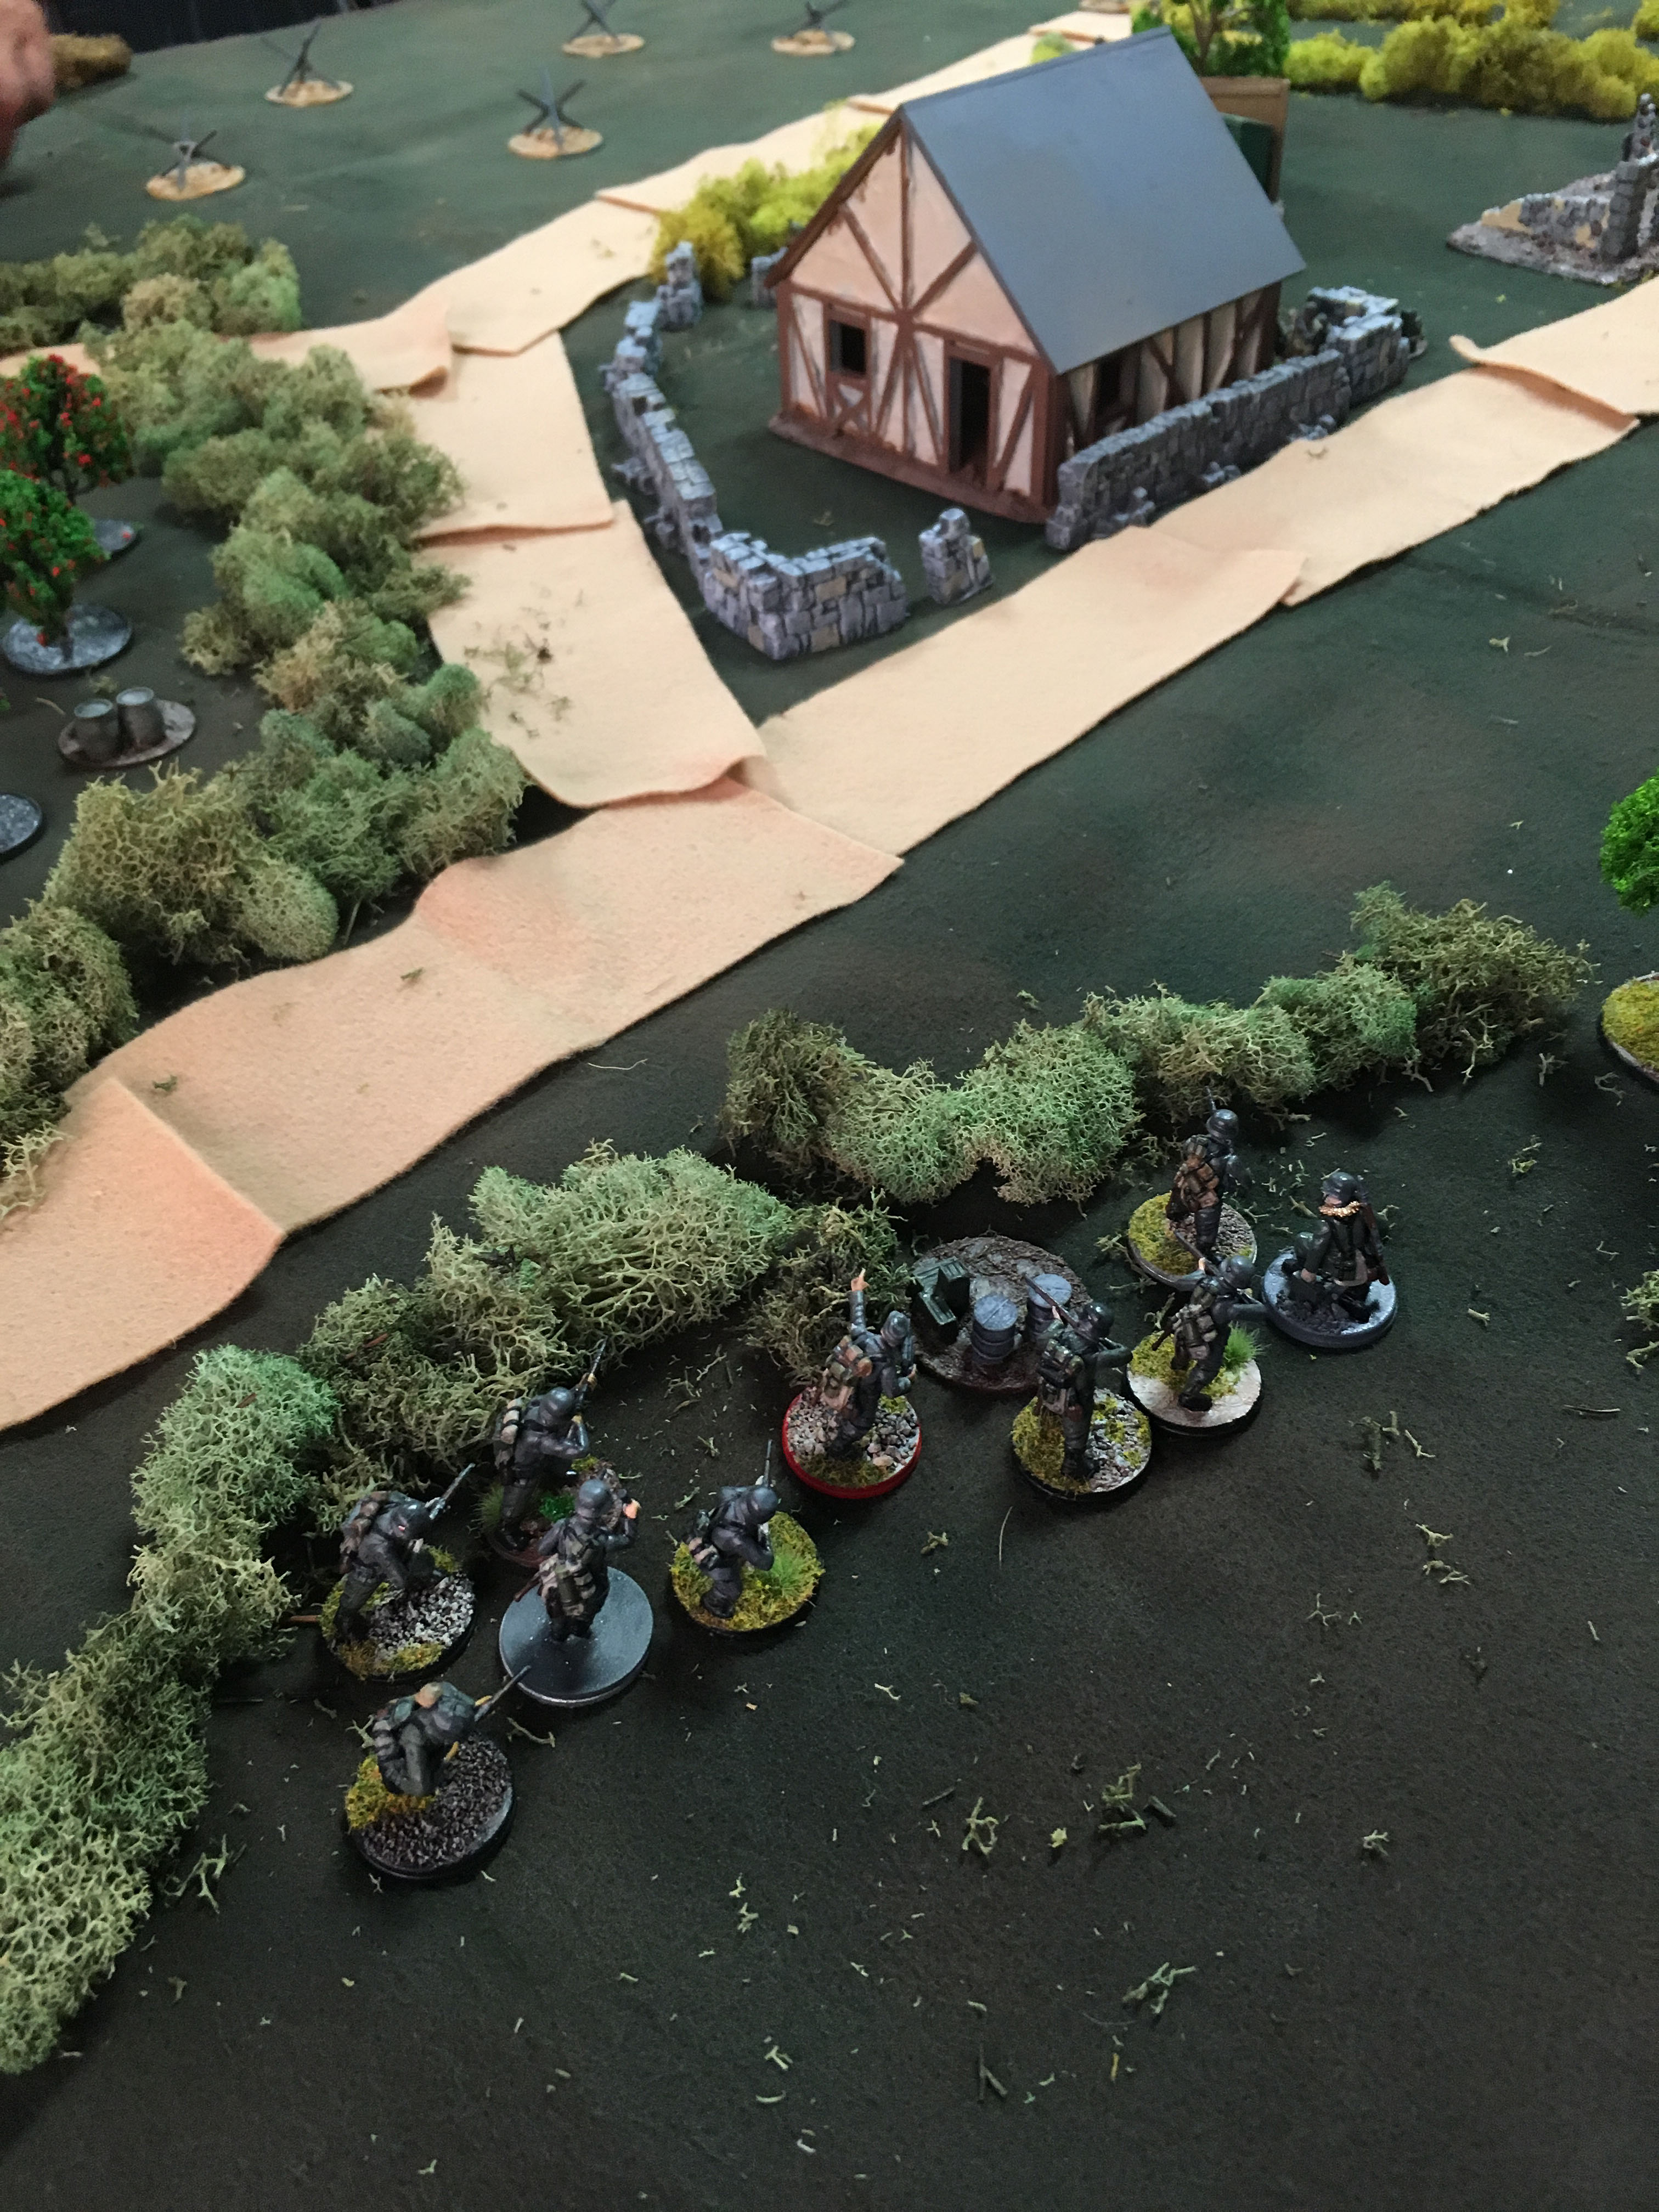
The building on the far left is the objective, the Americans have to either reduce my force morale to 0 or take the building and end the turn to win. Our Patrol Phase wound up with us deploying our jump off points about 3/4 of the way up the board, one either side of the second house and hedges there. Dan’s tank would, of course, have to deploy down one of the roads.
Dan chose his mandatory Sherman, plus a .50 cal and a .30 machine gun and the extra BAR for each squad. The .50 cal would go on to be the American VIP I believe, the reduction in cover being a major factor and one of the things that makes it almost mandatory for us now.
I chose a PAK38, an MG42, an adjutant and two pieces of barbed wire. With the Americans having TWO senior leaders and the Germans only having one I felt I needed to get mine on the board early. Rolling multiple 4’s would be an ongoing theme for BOTH sides during this game. I unfortunately left the barbed wire stands at home, so had to make do with a roadblock on the upper road. I think the barbed wire would have been a lot better, letting me deny the spot that the Americans used to great effect.


The game started off with a good American deployment at the house. .50 cal, one full squad and the platoon Sargent, I answered with two squads, one in the upper right of this photo and another just to the left with a clear line of sight down the wall in front of the house. I also deployed the MG42 in the second floor of the house. I fired on the .50 cal to no effect.


Dan opens up with his .50 cal dealing 4 kills to a German squad, it’s cover reduced to nothing do to the heavy weapon. My Germans respond with a double activation, deploying the Pak38 on the only road the Sherman can come down and firing on Dan’s mortar, doing only a single shock.

Dan responds with a double activation of his own, Firing the .50 cal on the same German squad up in the corner, causing them to break as the casualties and shock stack up. They will never recover from this and spend the rest of the game cowering behind several hedges.

Dan uses the Marching Fire ability to hop a wall and put some fire down on the squad I had deployed across from the house. The only thing that saved me was having gone tactical at the end of my last activation in fear of the .50 cal. Dan followed this up on his second activation with 2 kills and 3 shock! His mortar landed a round on the Pak38, adding one shock and a kill. I continued this throughout the game, using my senior leader on this squad to remove shock and have them go tactical, the only thing that saved them.

I used my activation to shoot on Dan’s advancing squad with both of my squads and throw some hand grenades to minimal effect, 1 kill and 1 shock.
Dan decided to bring on his Sherman at this point, unfortunately I didn’t have a full CoC die to fire on it with the Pak38! His main gun causes only shock on the anti-tank gun.
Thankfully I rolled another double activation! Firing with my squads and then following up with a Handgranaten attack I almost wipe out Dan’s squad at the stone wall, they break and Dan simply removes the 2 survivors from the table. I fall back behind the hedge I came from and go tactical again. There’s not much left of this squad but they would survive right up until the end of the game, falling back far enough that the senior leader could start commanding the MG42 to fire. 


My Pak38 saw it’s short useless life ended as the Sherman hits it again, causing two kills and breaking the unit. The two survivors run for their lives with five shock on two men. (use I’m using a 105 howitzer as the PAK38)

I roll four 4’s, only activating my MG42 to fire at the .50 cal. Dan one ups me by rolling five 5’s and quickly ending his phase.

The MG42 FINALLY kills the .50 cal in the next turn, it had been hiding behind a stone wall for so long!
At this point Dan has not managed to cross the road. His men are concentrated around this house, with one squad inside, one advancing to take the position I had assaulted at then retreated from. That’s a .30 cal team behind the house taking shots at my squad after routing the Pak38 team. Outside of this photo is a mortar team and a Sherman right down the road on the left. It’s not looking good for the Germans, but the Americans haven’t taken the house yet. I’m down to one squad that you can barely see on the left of the photo above, one MG42 in the house and the remnants of a squad in front of my house. If I could hold them here I can win at this point.
Dan advances his Sherman down the road, FINALY having a full Chain of Command die I ambush with my Panzerschreck team. A long range shot immobilizes the tank and adds two pins! Dan pours fire into my last full squad for a second round as causes them to break, abandoning their position. I begin to run my leader over to try and remove the shock.
As I activate next to follow up Dan does the same to me, killing the Panzerschreck team before it gets off it’s shot. And of course I fail to get a photo of the tank at any point in the game! It’s a Sherman, you’ve seen tons of them.
At this point we call the game. It’s after 10 and I have one squad reduced to an LMG team, one squad breaking, whats left of the first squad I deployed never going to recover from it’s broken status and an MG42. Dan has a full chain of command die and I have a force morale of 5. Dan can easily use his CoC die to end the turn and remove the two broken squads. He has an immobilized tank that has a line of sight to the objective building with the MG42 in it and two full squads along with two senior leaders on this board. We forgo the 30 minutes of Americans mopping up at their leisure and call it an American win.
This is our fifth game of the year so far. We’ve both started using our nations abilities to good effect. Dan was using Marching Fire to pin down one squad while hoping between stone walls, I used Hangranaten to effectively wipe out a squad that was causing me problems. Dan’s gets his money’s worth out of the .50 cal, reducing my cover along with the mortar he took for the same reason. I’ve been using my leaders to have squads go tactical, and now I need to start using covering fire and overwatch more often. I think the Germans are hampered from not being able to take another squad in this campaign. They can take a squad of green conscripts once in the whole campaign, and I’m not convinced it would be worth it. I would have loved to have a fourth infantry squad, it would have allowed me to be much more flexible in my coverage of the approach to the house. All in all it was a great game.
We ran a large Bolt Action D-Day event at the Schenectady Wargamers Association’s monthly Gameathon this July. I tried to do it in June but work got in the way. The original plan was for six players to face off across an 18 foot long table. With the beach at one end and airborne at the other. The ground scale had to be abstracted a little bit since the Airborne certainly didn’t land only a couple hundred feet from the beaches, but not having to stick to an actual historical site allowed us to design the table and objectives for a more balanced game. We sent out some messages to the SWA and local Bolt Action groups and got a luke warm response at first. As our pre-planning turned into actual planning and sides were being drawn up several more people showed interest and we had to expand the game to 8 players and STILL turn people away. Our 18 foot table quickly turned into a 24 foot table! On of the SWA members, Ron, made the beach and cliffs, propping up one of the tables to make the cliff’s 3D and I frantically tried to build enough terrain to fill the added table.

My panoramic photo ran out before I hit the beach! Here are photos of the individual tables
 The beach! Shawn’s Big Red One stormed the beach here, meeting fierce resistance from the German garrison.

The Artillery table! This was table #2, veteran German defenders played by Dave against my own veteran Airborne troops.

Murph’s Glider troops taking the crossroads in the face of a German counterattack by Bill on table #3

Table #4, Peter lands his glider troops and tries to hold of an overwhelming counterattack by Ron’s Panzer Grenadiers. Ron made the beach and cliff’s, then plays as far from then as possible!
A whole bunch of fog of war occurred during and after setup. We accidentally laid out the game mats differently than in the planning and the last table wound up being 4 feet long, and the first table 8 feet long. This had the effect of isolating the beach attack from any reinforcements (historical, but didn’t play into our plans of a balanced game), and giving the glider troops on table #4 no room to maneuver and an immediate engagement with the larger Panzer Grenadier counter-attack.
In addition Charles, the German beach garrison commander deployed ALL of his troops in the trenches, instead of half as we had planned. This wound up having a huge impact on the game as the numerically superior Big Red One was stuck on the beaches for the whole game.
With four tables and me playing on one of them it was impossible for me to keep a blow by blow record of the game. The beach and table #2 were attack/defend scenarios. Table #3 and #4 were meeting engagements with both sides trying to secure crossroads to deny them to the enemy and ensure that their forces could use them for rapid reinforcements. Shawn’s objective on table 1 was to break thru the defenders and off of the beach with his American infantry, the Germans simply had to stop this. My objective on Table 2 was to take two of three objectives, artillery emplacements with Nebelwerfers, 88’s and flak guns. Table #3 would be a fight over the crossroads between Murph’s Glider troops who were armed with 2 light AT guns and Bills Germans with a Sdkfz 222 and troops. Table #3 pitted Peter’s glider troops against Rons Panzer grenadiers. Ron brought a Panzer 4, a Puma and a Hetzer while Peter had one light At gun and bazookas, a bad deployment on my part unfortunately. The idea was that Murph would deploy his guns in a way as to cover the two boards he was in between, war doesn’t always go according to plan.
The Army Air Corp provided a preliminary bombardment on tables one and two and a few late releases cratered the roads leading across the boards. Repeating history the beach was only lightly hit, but table #2 suffered some irrecoverable damage even before the game started. Dave had deployed one full Vet squad, a sniper and a veteran Panzer 4 to the table. The prep bombardment hit all three! Two pins to the vet squad, killed the sniper’s buddy and nailed the Panzer 4, blowing it up before it could even get a shot off. Veteran Panzer 4’s aren’t cheap!

The game progressed from there. On my table I moved squads up to the mid point behind the hedges, positioning myself to take the house in the center and spread out to two objectives from there. 
Dave moved a veteran squad into the house and started hammering me on my advance. A failed close quarters charge wiped out my unit by the started of turn 3.
Shawn’s Big Red One stormed the beaches under the cover of their landing crafts guns, disgorging troops and a Sherman.


We abstracted the rules a little bit so Shawn didn’t have to buy landing craft that and risk blowing up his only way onto the board. Shawn Advanced non-stop, taking full advantage of the American rules and progressed up the beach under withering fire.
Murph and Bill on table #3 duked it out all day, trading blow for blow.

Murph’s AT guns never seemed to be in the right place at the right time, failing to get a good shot on any vehicles if I recall correctly.


Table 4 saw some quick gains by the American glider troops which slowly wilted under the firepower of the grenadiers. Ron had 1250 points of Germans against Peter’s 1000, to mirror the beach’s 1250 points of American storming the cliffs. A lack of support from table #3 and aggressive moves from Ron’s bloodthirsty grenadiers prevented Peter from taking the objective. A good arty strike by the Americans stalled the counterattack for a turn or two, and Peter almost took the house that was the objective but he just wasn’t able to pull out the win in the end.

On my table Dave ran in some mid-game reinforcements and turned them on Murph on table 3. After failing to stop my advances he saw a juicy target, a squad of veteran glider troops with a clear line of sight.
Murph had been trying to gun down one of Bill’s squads on the border of our table and Dave ‘snap to action’ed two squads to try and get the pressure off of Bill. Unfortunately it’s pretty hard to kill Vets and Dave eventually turned their fire onto one of my squads and wipped it out after a couple of turns of fire. 
The tables turned later on as Murph brought some sweet sweet justice and paid him back

My table (#2) was pretty much locked down for an American win as I steadily advanced towards two objectives.


Some token resistance from Dave stopped me from taking all three and sending any meaningful support to the beach, but couldn’t really stop me from winning.
Table #4 was all but a route for the Americans. Peter had gotten a squad almost into the objective house. Unfortunately close only counts in horseshoes and hand grenades. If we progressed into turn 7 he could have taken it and quickly lost it to the near by Germans.

The beach and table #3 were the deciding factor on the overall outcome. Shawn was steadily marching up the cliff and had managed to get a squad into the trenches, knocking out the Pak40 and was poised to engage a squad nearby. Unfortunately Charles still had several squads in the trenches and a Panzer 3 roaming around. We all came to the consensus that it was a draw at the end of turn 6. Shawn had a squad and several weapons teams either in or right at the trenches, but it was obvious that a turn 7 could easily go either way.
Table #3 looked like it could go either way. The crossroads was littered with burning vehicles and bodies.

The last few activation’s of turn 6 could re-write history! Bill ran his command squad up and took the crossroads. Murph ran a command squad and a bazooka team in, gunning down the Germans and winning the crossroads and the game! This was another slight case of fog of war. At some point BOTH players had heard that you needed to be within 6 inches to control or contest it, but it was the standard 3 inches. The Germans had a squad that was activated right out of 3 inches, which allowed the Americans to take it.
We were right up at the 4pm time limit, with only an hour break for anyone wanting to play in the evening event slot so we decided to call the game at the end of turn 6. Turn 7 could have changed the outcome for sure. Ron would surge up from Table 4 to add long range support for Bill with his tanks and I was powerless to stop it. I had a pack howitzer and a bazooka team ready to hit the beach garrison from the rear and take some pressure off of Shawn’s advancing infantry but I’m not confident it would have been enough. As it was we had a fun game and were ready to pack up and go home.
We’re planning on making this a yearly event and I learned some lessons.
Setup: I had taken pictures and divided all of the terrain up into bins by table. This greatly sped up putting it together and we were ready almost half an hour before I expected to be. I spent a lot of time with the entire board laid out in my basement making sure there were no 12 foot lines of fire across multiple boards and the photos helped ensure it stayed that way. I think next time that I’m going to actually grid it out though since a couple of objectives were a little out of place and were either too hard or too easy to reach (I was very close to holding two objectives on my deployment).
Written rules: I should have had a written copy of the rules including deployment, objectives, terrain rules and the custom rules for several things. This would have eliminated almost all of the fog of war issues we had and would have cut down on the time I spent answering questions that only I knew the official answers to.
Forces: Ron’s three tank grenadier force was unexpected and pretty much ensured that Peter could not win the board. I gave some loose guidelines but I think next year I am going to make up the forces and then tweak them to fit with the troops the players actually own.
Force sizes: The beach landing force had 1250 points and so did the counterattacking grenadiers. I envisioned that the entrenched Germans would be more of a roadblock with half of their forces still in reserves. Even with Charles deploying all 1000 points into the fortifications the Americans still made it up the cliffs and almost broke through onto the main land. I think I can safely reduce the American landing force to 1100 if I make the garrison force split on deployment and reserves. The German counterattack on board 4 would similarly be reduced, giving that American player a fighting chance.
It was a great game and now I need to finish painting all the things that were half done due to the addition of a fourth table. I should be done just in time for our January game, four tables set up in a semicircle to defend Bastogne from the Germans!
I haven’t been posting to this blog much lately, but I have been getting regular Bolt Action games in. My latest was a 1000 point game against a fellow club member.My Americans vs Drew’s Germans. We randomly determined the scenario to be No Mans Land. We set up our forces and attacked at first light. Both our preparatory bombardments hit hard, spreading pins throughout our forces.

I had a fairly mobile force backed up with medium howitzer and a medium mortar. I had used multiple HE units throughout the recent escalation league to great effect, denying the enemy the use of buildings and other sources of hard cover. Unfortunately this time I had switched to the US Army and had to bring an M10 tank destroyer instead of relying on panzerfausts as my anti-tank solution. A jeep armed with a .50 cal was intended to harass my original opponent’s tankettes but did some good work getting rid of veteran SS troops. A MMG armed truck with troops and a jeep with a bazooka team waited off board to rush on later and exploit any weaknesses.
Turn one started off with me trying to buy some time by giving down orders to my reinforcements, which can’t come on turn 1 anyways. One of the interesting twists with this scenario is that one turn 1 your vision is limited to 24 inches, its the crack of dawn and the dust from the preparatory bombardment is still settling. I ran out of units to go down with and had to act, drawing line of sight to a unit of SS in a crater with a spotter and lobbing a howitzer round in hoping to hit, and I rolled a 6! They were huddled together and I managed to kill five of the six man squad! This lone man would be the last German standing at the end of turn six.

The turn continued with Drew failing to activate his Stug, which received two pins in the prep bombardment. One squad of US troops could just barely see a squad of SS and fired, cover and range added up to a 5 to hit. A dozen dice were rolled and ended up killing 3 veteran SS troops. Great dice rolling that would continue through the game, leading to many poor bastards dying for their fatherland! Drew advanced a third SS squad up into a ruined building, springing a squad on ambush at long range. Another dozen dice thrown, another three fanatics fallen to American lead. The return fire did nothing to the ambushing squad.

Turn 2 started with an officer snapping to action both my howitzer and mortar to rain death down on a German sniper. My own sniper failed to act two turns in a row now and might as well have stayed home. Not a whole lot happened this turn, multiple squads on both sides failed to activate due to pins from the prep bombardment, My M10 failed to destroy the Stug for a second turn in a row. My jeep advanced up to support a squad of GIs trying to hold off a full squad of Veteran SS troops taking cover in some woods.

The turn ended with my Bazooka squad rushing up in the jeep and launching a round into the side of the Stug and glancing off the armor, leading to a Shaken result, and leaving the Bazooka squad and a jeep out in the open in front of a little too much firepower in a game where kill points win.

That’s a Stug, A squad behind the building and an officer and the remains of an SS squad hidden in the building on the right.
Turn 3 started with me pulling the first die and launching ANOTHER round into the side of the Stug, only to roll a 1 for damage! Only the pin! The rest of the turn was uneventful, Drew caused one casualty to the bazooka team, the empty transport jeep ran away so it wouldn’t die and drew rallied his Stug to get rid of five pins. My truck full of troops failed two rolls to come on, ruining my plans to save the bazooka team with machine gun and rifle fire.


Turn 4 saw some impressive action. My round started off with snapping to action my howizter and mortar again, a tactic I have come to love. Rounds landed square on a German officer, killing him and splashing damage on both an inexperienced squad and the Stug right next to it. My M10 FINALLY landed a round into the front of the Stug, causing massive damage and sending Hans the tanker to hell! That Stug had shrugged off a preparatory bombardment, two bazooka shells, a howitzer hit and an early M10 hit racking up numerous pins and holding out until turn 4! My truck FINALLY came on board, zooming up the board to pepper a squad with machine gun fire. It’s precious cargo hopped out and fired on the inexperienced squad, which failed the morale check for casualties and ran back to Berlin. 
The turn ended with my .50 cal jeep and a squad firing on a light mortar team which had peaked into the wrong patch of woods, each causing one casualty and wiping them out. Drew has had some poor rolls up to this point, failing multiple activation checks with one or two pins, rarely hitting with any fire and only managing to kill my bazooka team. Most of his force is wiped out at this point, leaving only three activation dice in the bag and one of them is the single SS trooper still alive after my first howitzer hit. all of his units are pinned and I was maneuvering to table him on turn 5.


Turn 5 had me wheeling my right flank around to murder everything wearing field grau on the back field. It was like Napoleonic’s, except I didn’t hate it! All of Drew’s units were pinned and failed activation rolls, which meant that all of my shots missed. 95% of my forces were shooting at three units and I didn’t cause one casualty!
Turn 6 finally saw the end of the Hun menace. 9 German units wiped out, 1 American unit killed.
The Prep bombardment had a huge effect on my win. Veteran units failing activation rolls, many units couldn’t shake all their pins, effecting their fire to the point of never hitting most of the time. I was hit just as bad, but I made my activation rolls and pushed forward. Two howitzer hits made a huge impact, wiping out a veteran SS unit positioned in the midfield to fire on everything and devastating the reinforcements on my right flank. This allowed me to swing around and finish him off in the last half. Getting three kills on 11 dice, 5s to hit and 5s to wound was amazing, TWICE!
Drew was a great sport during this game. I brought a 1000 point list and he scaled down his 1250 point list at the last minute to play me when my original opponent couldn’t make it. He played well and was and lost well, not sulking one bit even to the end. I don’t blame him for not staying for a second game though.
I rate him a 10/10, would murder him again!
I had rushed a whole bunch of minis for a convention game last year and then never got a chance to finish them. One of the things I wanted to get done this year is not have half done figures on the board anymore. So I ordered some grass tufts from Australia and they finally started coming in. I sat down and started finishing the basing of my Germans, and the hand full of minis that still needed dry brushing and highlighting. 50 some odd figures later I took some photos before packing a bunch up for a game this morning.
Click on images for larger version, as always.
First up: Some support pieces, two Nebelwerfers and an Infantry Gun. All three of these pieces were fully painted, but not really based. The crew for the IG are magnetized. I finished assembling the Nebelwerfers right as Bolt Action v2 was announced and the template rules were rumored so I simply based the crew separately. 
Next up, crew for various support weapons, including the Nebelwerfers. These guys were fully painted, but needed basing and flocking. all but one are from the Warlord nebelwerfer.

A couple of my Warlord early war German Assault Pioneers. The rest are in the list I’m currently playing so I didn’t have time to finish them up. These guys only had base coats done sine they’re a recent addition to my army. So wash, highlight, base and flock. I started using the grass tufts on these guys, especially they larger bases I use to protect the outstretched equipment.

Some officers and NCOs. I’ve started using a coloring scheme for the minis bases so I can ID them on the table easier. As I’ve been playing more games in dimly lit locations and my eyes get older I’m tired of picking minis up to figure out what they are. Red rims means NCOs and officers. There is a British officer in there from my Ghurkas, he just needed flockign and the base painted so he got tossed in.

I was doing mainly my German figures, but these two American .30 cal teams were on the desk for some reason and all they needed was basing and flocking so they got done too. Light grey bases are for special weapons in squads. Since these guys are redeploying their .30 cal they will be used in Bolt Action squads that can take the .30 cal as a squad LMG.

German assault rifles. most of these were completely painted but a couple were from the last batch I did in the summer and needed dry brushing.

German non-NCO SMGs. In Bolt Action you can often add extra SMGs to a squad, so I had a bunch extra made up.

Panzerfaust armed riflemen. Lately my AT solutions for Bolt Action have been layered, with a vehicle (mostly a Puma) as my main AT weapon, panzerfausts in infantry squads to scare my opponent away and act as a backup AT solution and various artillery as a distant third option (mostly to add pins and stop them from activating). So I needed to finish up some panzerfaust troops. My regular troops will have plain black rims, just something to clean up all the paint on the sides and add a uniform look. Bright colors for what I need to pay attention to, dark for what I don’t.

German rifleman, the bread and butter of any army. I have a LOT of them that need to be finished up, and a bunch that need to be repaired due to Warlord’s shoddy first generation plastics.

That’s about a weeks worth of work, maybe 10-15 figures needed to be dry brushed but it was mostly adding basing, waiting for it to dry. base coating the basing, waiting for it to dry. Dry brushing the basing and adding the flock, waiting for the glue to dry. Painting the rims, sealing with the airbrush and then waiting for it to all dry. Lots of waiting…
We’re wrapping up the NY/NJ Bolt Action Escalation League with our 1250 point round. Time to break out all the cool toys! The league is my first experience with playing regularly with another ‘meta’, I’ve played for several years at ToyWiz and we’ve pretty much settled down on plain vanilla ‘meta’ of paying lip service to historically accurate lists and not swinging to any extremes. With the change to the Down order it has become viable to take multiple Veteran squads and go Down when getting shot. Now this isn’t all that cheesy, but it does bog the game down and frankly it’s not a style I enjoy playing or playing against. Too many of the scenarios in the base Bolt Action system require you to move across the board, something you can’t do if you’re always going Down. None of the lists I’ve faced from the upstate guys have been overly cheesy (or cheesy at all for the most part) and are at least as historical as what I’m used to. I’m just not used to vet squads going down non-stop and not dying to overwhelming firepower, I’ve struggled to find a way to deal with them like I’ve normally dealt with opponents. Until this game that is…
We met at Proctors Theater for the Schenectady Wargaming Association’s monthly Game-A-Thon once again. We had a modest showing of six people, several of our regulars had to work and one was off doing Boy Scout activities. I faced off against Zach and his early war veteran French colonials. He had a three veteran squads in armored cars, two medium howitzers, an AT gun and a Char B(?) facing off against my three late war German regular squads, two medium mortars, medium howitzer, Wespe, Wirblewind, a veteran engineer squad and a truck for some mobility. I’ve wanted to keep the Panzer Grenadier theme going for my list but I had to dial it back a bit to fit on the mortars and the howitzer, which were key to my tactics. Before I’ve used two trucks and one or more Stummels which can (probably do to a type on the rule book) hold 8 men in addition to the light howitzer it carries.
I liked Zach’s list, its the French version of the list I’d like to play, if I thought I could make it work against the ‘downed vets’ tactic. It’s historical, has no cheese in it and he played it well I think.
Click on photos for larger versions

 |
 |
 |
 |
The battle was being fought around a farm, three objective markers were placed on my half of the table and Zach had to come get them. The difference between this scenario and Point Defense is that in order to win you need to have more objectives than your opponent, not two out of the three. Obviously I wanted to hold all three objectives but my fallback strategy was to hold the rear most objective and contest the other two, eeking out a victory on technical grounds. We lined up across the deployment zone, which actually stretched diagonal across the board from corner to corner. Zach put out his howitzers and a squad and held his armored cars in reserve, pushing his Char B up as far as possible. I had a squad in the grey roofed horse stall, a mortar behind it and my Wespe, Wirblewind and howitzer in position to hopefully take out the Char first turn! I quickly realized that the Wirblewind could do nothing to the Char B, and took a pot shot at the Char early turn one, nailing it but failing to do any real damage aside from jamming the turret. Zack’s howitzers tried ranging in on my howitzer and Wespe, but failed along with my own howitzer and mortar to find their targets. I learned the hard way that spotters are now considered to be always down unless they are given another order, one of the subtle changes that I had failed to notice. Zach’s howitzers were hidden safely behind several pieces of line of sight blocking terrain and the only way to deal with them would be to murder their spotters with overwhelming amounts of lead. Unfortunately this would only happen turns later as I had to go to extremes to get it done do to the added -2 from the assumed Down order.Turn two started with a great hit on my Wespe buy Zach’s howitzer which failed to kill it but immobilized it and added four pins to it, ensuring it’s death on turn 3. My truck full of panzerfaust wielding grenadier’s failed to come on the table, allowing his Char B to fire on a couple of my units and spread some pins around. Zach failed a roll to bring on an APC full of veterans so I guess it evened out. Reinforcements were brought onto the table by both sides. My flamethower wielding engineers ran from the board directly into a building. The fact that they didn’t hang around in plain sight would cause an upset later in the game. Things weren’t looking good for me on turn two. My Wespe was obviously going to die. I had spent the first two turns trying to take out Zach’s spotters, especially after one had ranged in on the Wespe. But first fulls of dice from the Wirblewind, multiple rounds from mortars and the howitzer all failed to find their mark and the spotter lived!
Turn three started off with Zach nailing my Wespe, as expected and taking out a LT in the process. My Howitzer had to move to not only get a better line of sight but to shake the second howitzer’s ranging in. Three turns and my howitzer had done nothing! Zach’s other howitzer scored a hit on the Wirblewind, taking it out before it could do anything effective. It would only play a roll as providing cover for my troops behind it. Zachs’s troops were moving up into position by this point, coming up to the red barn trying to take one objective and position themselves to assault the grey horse barn.
This would become deadly ground of the french colonials, as several squads and APCs would be finished off here by three of my squads. An APC moved up on turn two, unable to dismount it’s troops due to running. On turn three they were joined by a second squad that ran into the barn itself hoping to fire into the horse stall next turn. Somehow Zach had missed that the veteran squad I had in there carried a flamethrower. I was talking to a buddy about the force before the game and I though Zach knew. The next activation they opened up. The flamethrower killed three men and added four pins to the squad. The rest of the guns failed to do anything and the colonials managed to not route off of the table. The dice started rolling in my favor on turn three though. My mortars were ranging in and getting lucky 6’s. This trend of high explosive death would continue all the way through turn 7. My howitzer spun around and nailed a squad hiding in the building. The recent changes to HE meant that it was easier for me to hit the building than a squad. Zach went down to minimize the damage and I rolled the 5 I needed, decimating the squad, killing 4 out of the 7 and dealing 3 pins to it. except I actually needed a 6 to hit. I followed that up with a mortar hit that killed 2 guys and added a single pin. A consolation prize at least. My truck full of panzer grenadiers came onto the board and almost made it into range to kill the Char B, but at least they poured fire into the spotter and missed! The tide was turning!Turn four was where my tactics started to shine, with a heaping load of luck. Zach advanced his Char B into range to shoot my men and the truck they came on on, missing all of the rolls needed to hit and damage. They returned fire nailing it with the panzerfausts he had forgotten they had, dealing massive damage with one and blowing the tank up. They also murdered the spotter directly in front of them. Standing still had taken the to hit roll down from 6+6 to straight 6’s and plenty of German rounds found their mark. A Squad of men advanced up and nailed an APC with panzerfausts. They needed 6’s to hit, movement and a pin from Zach’s sniper. Two sixes! Blown up APC. The veteran squad inside comes out and goes down. The flame-throwed squad of Zach’s failed it’s activation check with boxcars! no FUBAR for me, but they fled away along with jokes of toasted baguettes. The turn ended with the tide turned in my favor.
Turn five saw Zach’s sniper finally move into a position to fire again, after a couple of turns of firing on the only squad they could see Zach blocked their line of sight with various APCs and squads. The last fresh squad of veteran colonials advanced out and killed the now panzerfaust-less to a man, they simply couldn’t withstand the withering point blank fire. Zach had maneuvered up this squad and we both had thought was relatively safe. But my recently re-positioned howitzer was able to take a long shot, through two buildings and rolled a 5, hitting them with the 3 inch template. I can’t remember if they were all killed or failed the morale test after 50% casualties but they disappeared. The engineer squad advanced out and flamed the APC which moved them up and it failed the morale test after the attack, routing it. Some re-positioning on both of our parts moved units into line of sight, setting up some killing for the turn six. The last activation of the turn was one of my medium mortars. I had only one shot, drawing line of sight from a spotter to what was left of a colonial squad. I couldn’t re-position to a better spot so I just tossed my die, which landed on at least the third first shot 6 for my mortars. The squad was bunched up and the 2 inch template hit all four, killing them all. Eliminating the last of the French infantry squads and securing two of the three objectives for me. It also left an empty APC with no friendly troops close.Turn six and seven left only mopping up. A sniper was hiding on a corner of a building, an LT was close enough to contest an objective that I still needed to take and Zach still had two howitzers and an AT gun left that were slowly re-positioning. My engineers murdered the sniper with hot fire and continued the steak of not running out of fuel, six games so far! although plenty flame throwers have died to snipers, close assaults, mass fire and other calamities. In an effort to win with all three objectives I advanced out of buildings to kill the LT on the objective. I loaded a squad into my truck and chanced the run past an AT gun on ambush, and lost! Truck blown up with surprisingly little damage on the squad inside. They jumped out in perfect position to assault, but it was turn 7 so they would never get the chance.
 |
 |
 |
|
My strategy going in was to exploit the Down order in my favor. Several times over the course of the game after Zach went down in response to fire or HE I responded by firing a mortar at him. Indirect HE is not modified by cover or range, it starts at a 6 to hit and gets better as long as the firing unit AND the target don’t move. My first activation for the next round would be the same mortar, hitting several times (often times rolling a six, adding insult to injury). Several times my mortars hit first turn, once on an APC. In addition the HE has a penetration modifier, reducing the target number to wound from 5 to 3 or even 2. I honestly can’t recall my small arms doing more than one casualty per activation, if any. 95% of the casualties I caused were due to one heavy weapon or another. In addition the first time Zach ran a squad into a building I hit it with HE, not only ignoring the cover bonus but also the extra protection that buildings give to infantry. I got lucky with 3 first turn hits from mortars, but odds were on my side with two medium mortars and two medium howitzers. Once a unit went down I would have at least one chance on a 6 and another on a 5 in the following turn, more if both mortars could fire. The medium mortars and the flame thrower were punching far above their weights, killing several times their points costs and making no part of the board safe except complete line of sight blocking cover, which was hard with spotters. Zach’s careful movement into cover and down orders were hugely successful against my small arms, but offered no protection to steel rain and gouts of flame! My vehicles were taken out before they could do much in the game but my real AT solution worked, panzerfausts in every squad. The flame thrower even scored a vehicle kill!
This was a great game, at least for me. I’ve been practicing with some version of this list for the entire league and it finally came together successfully. Zach played well, but my poor luck in the first half of the game turned around and what seemed like hundreds of sixes were thrown in rapid succession.
I met up with Paul to get a game in for the Bolt Action escalation league. Paul set up the table and then we chose to play the Key Positions scenario since it was one of the monthly missions. Since it was one of the special required missions there were a couple of changes to it for the league. There were extra objectives, Three of them had to be placed near the center line and an infantry unit could chose to blow an objective up if it ended the turn on it. These changes ensured that there would be fighting, since several of them HAD to be in the center, and you couldn’t leave them undefended in case your opponent rushed up and destroyed one you were counting on claiming at the end of the game.

The objectives were mostly clustered around the patch of forest and the ruined buildings on the left side of the board, with only three of the ten objectives following the road up the right side.
The first two turns were fairly uneventful as we deployed onto the table and traded a couple of shots across the battlefield. We both had two units flanking, Paul had a flame thrower team in a kubelwagon and I had an pioneer team in a truck.


The exception was my Puma coming out late turn one and getting a great hit on Paul’s Hanomag with a squad in it that was poised to take an objective at the end of the turn. I rolled a six to hit and a one to damage! Despite that being enough to damage the Hanomag, one’s don’t do damage! I put a single pin on the Hanomag and the squad inside. Paul’s howitzer armed Panzer III came out and missed a shot! That single pin would wind up being very important on his green volksturm squad. We both realized that they couldn’t exit the halftrack because it had run to get up there.

The turn starts with the the Panzer III moving into cover and nailing the Puma with a shell, failing to damage with its +2 pen vs my Puma’s 8 armor, but putting 2 pins on it. The Puma strikes back, rolling the 5 it needed to hit, a six on the damage resulting in massive damage and another 6 on one of the dice, brewing it up! Paul’s Hanomag had parked itself ontop of an objective, allowing him to blow it up at the end of the turn. His green troops inside had failed 3 activation rolls due to the single pin, but were still able to destroy the objective while inside the transport. Paul had also moved another squad up to sit on an objective near his deployment zone. My troops in the center of the table were ready to spread out and take these two objectives since I didn’t think I could take three of the objectives on Paul’s half of the table, so I needed to stop him from blowing these up. Late turn 3 I rushed my flanking truck onto the table, firing it’s machine gun point blank into the volsktrum squad sitting on the objective in the rear. I inflicted 5 casualties but he still left the man on the objective. Paul rolled a 1 for the result of his Green ability, adding FOUR pins to the squad. I immediately fired my sniper, adding another and killing the man on the objective and leaving the squad with a single man with a panzerfaust. Paul’s green squad in the Hanomag was finally able to make it out, just not the way he wanted. The truck had a pioneer squad in it that jumped out and lit the halftrack on fire, blowing it up and forcing the squad out and down, surrounded by enemy machine gun, they didn’t last long. The lone survivor of the squad in the rear got it’s revenge, fire off it’s panzerfaust through the pioneer squad and blowing the truck up.


Meanwhile in the center of the board. 

By turn 4 I had advanced two squads and a truck up to a couple ruined houses, facing off against Paul’s one squad and a Puma. The Puma had missed a couple shots into my truck, which was sticking close to the infantry so it didn’t rout. Shots were traded back and forth, mortars and artillery missed. Turn 4 opened with an advance into partial cover and a point blank shot into the front of the Puma with two panzerfausts. Succes brewed it up. That was quickly followed up by a howitzer hitting with it’s indirect shot nailing five men in ruined building right behind the smoking Puma. The left flank had collapsed and the center was following.

 (that building HAD a full squad in it a second ago…)
Paul’s latch ditch effort to kill my Puma was to rush the Hanomag up to point blank range and hop his flamethrower out to take care of it. Unfortunately after his Hanomag flanked up I drew a die before he could get his team out of it and destroyed the car with a shot from the Puma’s AT gun. The team was forced out, took FIVE hits and was destroyed. I was surprised that I could roll more hits than the team had but I couldn’t find anything that said it was limited. This only left a couple of Paul’s units on the board. His command team, a sniper, one squad that had taken a couple of hits and a MG42 team that had so far not fired a shot.
Turns 5 and 6 saw me mopping up what was left, one squad got back into the truck to rush forward and kill his command team, my LT gunned down the sniper with STG44 fire, the mortar team rushed forward to capture an objective as I moved guys around to try and take as many as I could.


The game was a victory on my part, holding 7 of the 10 objectives on the board. Paul played well, but my dice were on fire and he failed to damage at a couple of key points. His Puma was never able to get into position to get a shot on mine without giving me point blank shots at his rear with panzerfausts. His Panzer III was taken out before it could get shots on any of my infantry and his panzerfaust armed troops were stuck in the Hanomag with a single pin keeping them from activating. My howizter only hit once, but I was able to follow it up with a successful attack that caused a failed morale check.
I’ve tried to keep this list mobile as the league goes on, wanting to play a panzer grenadier list. Most of the time I’m able to get a squad into position with a well timed transport activation and support it with the trucks guns for a turn or two before it gets nuked. This game I was able to use my trucks very effectively, deploying the pioneers just when I needed them and redeploying a squad to secure the backfield late in the game. This is probably the best use of the not normally long lived trucks I will ever have. For the 54 points they cost I’m usually very happy with the one round of mobility and usually two rounds of machine gun fire they give me.
I had expected the road to play more of a role, but after the objective placement and unit deployment early in turn 1 I had decided that my focus was on my left flank, using the hill to hide my Puma until it had secured that side. My plan was to use the blown up truck as cover and advance on Paul’s Puma, or hit it with panzerfausts if it moved on me first. Three squads with two panzerfausts each and the flamethrower in the pioneer squad were my backup plan.


